Wednesday, November 30, 2011

DIY Christmas Cards

Last year around this time I was busting my butt at Walmart as a cashier and being completely miserable.  I'm totally loving the holiday season this time around because 1) I'm not at Walmart, 2) I get to do fun projects and decorate, 3) I'm not at Walmart, and 4) ... Walmart sucks. 


Today I decided to just mess around with some DIY Christmas card ideas I had swirling in my head using the materials I had on hand:


-ribbon
-white cardstock
-stamps
-watercolor paints
-a gold paint pen 


After just playing around I've got about 7 or 8 (I say about because one I might pitch because it's not as perfect as I'd like to to be...).


Here's the fruits of today's labor!... 


I just noticed that this wreath looks like one of those color blindness tests! Haha.


Tuesday, November 29, 2011

Nifty Gifties

Well, the weekend wasn't all fun... we returned Salem to the SPCA because he just wasn't working out.  The poor thing was scared all the time and really didn't mesh well with Ian.  I'm still feeling incredibly crappy about it and wish desperately he had worked out.  I really hope he can find a good home... 

Anyways, on a happier note... remember this from yesterday's post?


That cute little present is actually a Kleenex box wrapped up (inspired by these on Pinterest)....


Simple and cute!  And in the wintertime there's no shortage on Kleenex boxes...

Monday, November 28, 2011

So the day after Thanksgiving Russ and I put up our Christmas decorations...


Sunday, November 27, 2011

Picture This!

We've been having a fun weekend around here, just puttering around and hanging out.  It's been great. :)


One thing I've been working on is my new decor wall in my hallway.  


So, when we got Ian we had to find a place for his litter box.  Unfortunately the only space available was the closet where our water heater was housed.  And... the door wouldn't stay propped open on its own and had to be opened all the way.


Lovely, right?

Well, a few weeks back we actually discovered where they were hiding the doorstops in Walmart and bought one so we didn't have to display the litter box for all of our guests. 

And yes, that is a skinny closet at the end of the hallway!

Yay!  Much improved.  But, it then left the wall beside the door empty (ignore the pictures now hanging there, I'll get to that later...). 

It's not like me to leave any blank wall in my apartment undecorated, so I rifled through my picture/painting stash and put this tentatively together to camouflage the ugly thermostat.

Here's what I came up with as for placement:


I love all these pictures separately, but together they don't flow that well.  I love the R and A monograms but I really thought something simpler would be better.

After purchasing a $5 watercolor set at Michael's...


I thought of something simple to paint for one of the frames.  Ombre pine trees.


Not bad, but after messing around with a few different techniques I ended up with these...

And unfortunately found out that one of my glasses in the frame is cracked. Poo. :(

I really think they look pretty awesome!  And it was SO easy to do.  Just different colored paints with an 'up' and 'down' brushstroke pattern.  I like how the right one looks almost like seismic measurements. 


We'll see if they end up fitting into the rest of the picture wall but I'm kinda in love with them... 

Peanut Butter Cookie Time!

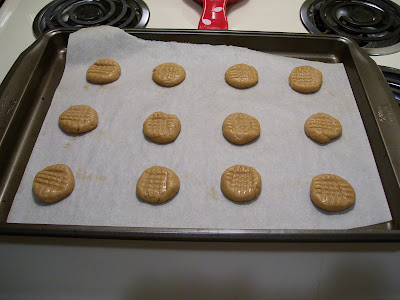
This is the best peanut butter cookie recipe that I've ever made and I just found it through a random search online here.  My cookies never look like the picture, however, they always look like mini pancakes but they're delicious mini pancake-sized cookies!


Ingredients:
1/2 cup sugar
1/2 cup brown sugar
1/2 cup butter, room temperature
1/2 cup peanut butter
1 egg
1 1/4 cup flour
3/4 teaspoon baking soda 
1/2 teaspoon baking powder 
1/4 teaspoon salt


Beat the butter until creamy, 2 minutes. Add the sugars, beat for 2 more minutes. Mix in the peanut butter and egg. Mix together the dry ingredients - flour, baking soda, baking powder and salt. Stir the dry ingredients into the sugar butter mixture.
Wrap dough in plastic and refrigerate at least 3 hours. (I never usually do this, that's probably why mine turn out so flat!) 


Preheat oven to 375°F. Shape dough into 1 1/4 inch balls. Place about 3 inches apart on ungreased cookie sheet. Flatten in crisscross pattern with a fork. Bake until light brown, 9 to 10 minutes. Cool on baking sheets for a minute; transfer to rack to cool completely.
For chewier cookies, bake at 300°F for 15 minutes.
And yesterday, I had help baking cookies... Russ!  Though, he didn't want his picture taken because he doesn't want to be on the blog (even though he already has a picture or two on here... haha).

Butter and sugars...

Butter, sugars, egg and peanut butter...

This is what usually happens during kitchen time... 

After the addition of the dry ingredients.


Very flat peanut butter cookies... but they're chewy and perfect otherwise.

Saturday, November 26, 2011

Easy Monogram Glass Ornaments

Using some glass ornaments from Michael's and a gold paint pen, I carefully drew a monogram.


I even used the paint pen to paint the little ornament cap gold to match.  Ended up pretty adorable... 

Friday, November 25, 2011

Before and After: Dumpster Frame

Last week when I was taking out the trash I found this frame sitting on the top of the dumpster:


Yeah... not really my style but I loved the shape of the frame.  And bonus: free.  I decided that I was going to try and fix it up and if it didn't work, I'm not out any money and I could just return it to the dumpster. 

With a coat of chocolate brown paint, it was much improved.


Still wasn't feeling the girl sitting on the bench... not really into it so I took it out of the frame and cut out the picture.  I then used some cream paint to paint the matting that was left over.  I thought I took pictures of that too, guess not... 

I hung it up for a few days until I could figure out what I wanted to do with it.  It was seen here in this post, just hanging on the wall bare: 


After an inspirational trip to Michael's, I found some scrapbook paper that had some potential. I just had to figure out what I wanted to paint on it...


Took inspiration from my jewelry box...


I think it turned out well! :D

Thursday, November 24, 2011

Happy Thanksgiving!

Our Thanksgiving in pictures...


Parade time...


Tim Burton's balloon...


Ian trying to convince me with his cuteness that he deserves more turkey.


Ian and Salem get turkey dinner too.

Dishes... :(


The end.