Showing posts with label furniture. Show all posts

Friday, June 7, 2013

Plain To Stained

After living with unfinished night stands for nearly FIVE months... I can proudly cross these babies off the list. 

Remember when I was getting some 'rast' ideas back in January and settled on this beauty:


Source

I liked the sleek look of bronze, t-bar handles though. I did numerous searches in home improvement stores here for them and even tried to find something I liked just as much. Ultimately it was Amazon to the rescue and I scored these for $1.49 each!

I went to Lowe's on Sunday to get my supplies and felt terrified at the thought of staining something. I wanted a gel stain because I heard that was easy to use but the colors they had were all wrong. 

I ended up choosing the color 'kona' from Rustoleum. 

Source
I totally didn't need such a huge can of stain, polyurethane, and paint but I wasn't sure. I was so intimidated that I just didn't want to not have enough!

I think the total for the materials came to about $45 (it would have been less had I bought smaller cans but maybe I can use these on other projects!)


I sanded the pieces even though they felt smooth already. There were a few rough spots here and there.


After gritting my teeth and putting the first swipe of stain on, I had a mini-heart attack because it was SO DARK. It was almost black which was not what I wanted at all. Luckily Mom was right there because she told me to take my cloth and wipe it off some. After that, the color was perfect! I only ended up doing one coat but I think they looked awesome. 


I did three smooth, even coats on the drawers with the Olympic paint I bought. 


Over the next two days after work I coated my work in polyurethane liberally but not too thick. I wanted the finish to be smooth and really made sure I didn't have any spots running.

Today I came home and couldn't wait to put them in our room!


Ah! I'm in love. I think they turned out so great! I can confidently say that I've stained something now!
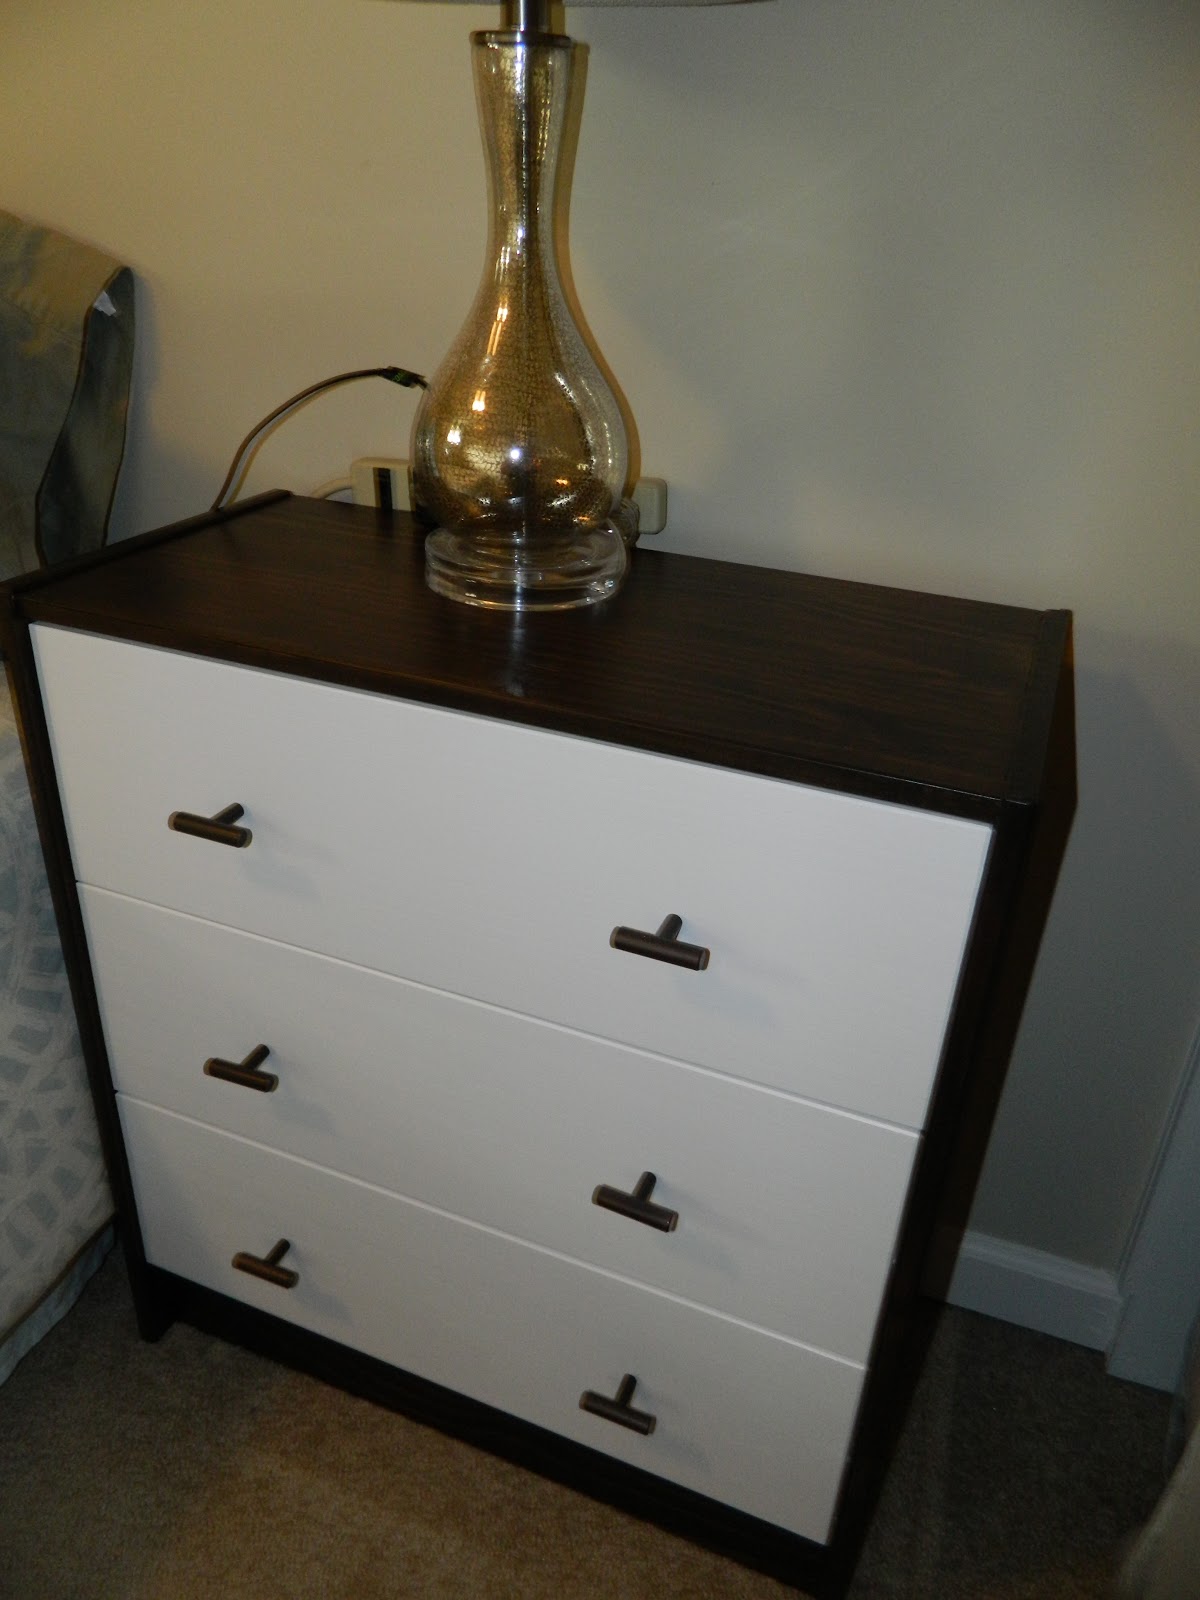


So much better than this!

Saturday, April 27, 2013

Craigslist Amazing Find!

So, on Wednesday night I was casually perusing Craigslist fully expecting not to find anything really of value. There's always the standard fare like 80's dining tables priced for $500, lovely mid-Century Danish furniture for $275 a dining chair, horribly pastel hand-painted side tables, waiting room furniture, and stuff that husbands list just to make their wives happy about getting something out of their garage. 

Then I saw this:


It was listed as $100 for the entire set. For. The. Entire. Set. 

I quickly jumped at the chance to hit the "reply" button to try and snag this amazing deal. I was also a little nervous because 1) last time I tried to purchase something on Craigslist the guy basically said, "yeah, I'll meet you on Saturday at the mall" and never showed and 2) I've never bought anything on Craigslist. 

The couple were very polite and responded to my excitedly-written email by giving me more detailed pictures. They just wanted to make sure that I was aware that the set wasn't in brand new condition and included these:


I still wasn't deterred and wanted to see the set so we decided that I'd drive down to South Seattle and take a look. I wanted this table bad or I might have second guessed driving down there in rush hour traffic. The normal twenty-five minute trip took over an hour but I occupied my time by dreaming of an awesome dining set with newly recovered seat cushions. 

A quick glance at the table (which they had nicely already removed the table legs and hardware) and a chair test (they were all solid and not wiggly!) and we knew we had to have it. Sure, it had some imperfections but it was solid wood and if it had a really horrendous problem after adding some Old English scratch cover, we could refinish it. 

The couple actually told me that they had many, many inquiries on the table but my enthusiastic emails set me apart and they knew I had to be the one to have it. Isn't that funny?

It fits in so beautifully into our little 60's rental! It also came with a table leaf which would be cool down the road if we wanted to use the four chairs for the sides and maybe find two similar chairs for the ends to make it a six-seater. (I couldn't wait to get home today from my internship just to gaze lovingly at it.) 


I am totally psyched with this purchase! Isn't it always the case that you find something when you're not even looking? I'm also not used to having such a wonderful Craigslist selection. The best thing I could find on Craigslist in Virginia was some old toilets someone had sitting in their lawn, toddler clothes, a particle board dresser, and if I was lucky, a used waterbed. 

I can't wait to refinish the seats (because baby blue is so not my style) and I'm just now starting to shop around. I've got a few that I like:

Source

Source
I wasn't necessarily going for neutrals but that seems to be what I'm leaning toward right now. I want something that's going to wear well and not discolor from blue jeans because I've seen that with my recovered desk chair that I did a while back. 

We'll see how it goes, I'm just ecstatic from such an awesome find!

Tuesday, April 2, 2013

Table For Few

Our little dining set is rather well-traveled. From our first apartment in Virginia Beach- 


To our second apartment in Norfolk-


To our current residence in Washington state.


After nearly three years, our cute little espresso table is finally showing its age. Having only cost $199, that equates to about $67 a year we've spent on this table. With all the problems the table has, there's no really rehab-ing it at all. It wasn't made with solid, durable wood so the only option really is to toss it out or donate it to Goodwill or something.

The top is scratched from anything from sliding a plate across it (seriously) to nail scratches from my cat's running leaps. 


We've been looking for a reasonably priced replacement for months now to no real avail. The only tables that I've been in love with are at World Market. They often have 50% off dining table sales but we have yet to pull the trigger on getting one. The World Market tables have a beautiful, weathered look on top which would prevent it from becoming defaced from cat scratches or normal wear and tear. 

First, there's this modern country table that was recently on sale for $224 from $299. It also came in a gorgeous turquoise and white options that are since discontinued. However, this table is temporarily out of stock online and our local World Market doesn't have it! 


Wouldn't the table look beautiful with these chairs from Overstock? You can get a set of two for $144 (and Overstock often has coupons and sales too).


There's also this metal table with a weathered top that was recently on sale for $263 from $329. I don't like it nearly as much as the first table but it would be an interesting choice. I haven't found any chairs that I like with it and the ones that come in the set are metal and extremely uncomfortable-looking. 


There's also two DIY options that I love as well. I would love to make a table but the thought is also extremely intimidating. 

From A Beautiful Mess there's a lovely table with some quaint, mismatched painted chairs. I'm totally in love with the mismatched look and love the yellow color. I'd love to replicate this look but I'm not sure about my building ability or what color I'd paint the chairs. 


Another blog, Creature Comforts Blog (that I found via Pinterest) completed a weathered table with legs bought from Ikea for only $10!

This table even makes those uncomfortable metal chairs look charming. 


This table dilemma leads me to the eternal question: DIY or buy? I've been afraid to make a decision so we've just been living with my poor, shaky, old table for nearly four months now. What to do?

Friday, June 15, 2012

Before and After: Dumpster Nightstand

So it's probably been over a year since I finished this project and I'm just now sharing it. But, whatever. I haven't been up to much around here decor-wise lately because I'm feeling the Summertime laziness. I'm also feeling some Summer trips coming on and I don't want to splurge on home decor when I could save an splurge in places like the beach... or DC... or Charleston... or Savannah... AND in *gasp* 174 days we have to be up and out of Virginia for good.


I've been up to my neck in apartment searches and... it sucks. It sucks looking at apartments in a place I've never visited (I've done that before). And it seems that apartment reviewers are always so horrible. I'm not even sure what we're going to do and where we're going to live. I know I've got months but we're in the middle of June already and it makes me feel calmer about all the impending things to do if I start early. 


So yeah, the dumpster furniture fairies dumped this drawer-less nightstand.


At first I was hesitant to take it. I mean, it had no drawers so what the hell could I do with this thing? I envisioned maybe taking the middle rung out and hanging a curtain and storing a basket underneath it for something (?). Surely I couldn't find perfect baskets to fit the nightstand like drawers, right? Wrong. 

So I hauled the item upstairs (and really, what happened to the drawers? There weren't even broken drawers lying around either) sanded, and painted it with my leftover paint from my coffee table to make the project even more cheap. 

Upon a trip to Michael's I was astonished when I found and measured shallow baskets (which were 50% off!!) that would fit in the slots. Amazing. Usually my luck isn't that good. 


The baskets fit amazingly well. I mean, there is NO WAY I could have found better-fitting baskets. So far, the total for this piece is now $20 in just the baskets alone.

After living with the piece a few days I decided... something's missing. And since I'd been looking online at all the amazingly painted, intricate furniture I decided that the top was screaming for a cool design. 

I couldn't even instruct anyone how I did the design because it was difficult for my brain to wrap around taping off the figure. I'm pretty sure it involved drawing what I wanted on paper, making a stencil, and taping off the design for at least an hour before painting. 


And it's been living in my dining room ever since. It holds some table linens and candle holders and such (I also used it for a board game or two before we had a larger collection). 

That's the last piece of dumpster furniture I collected... and it's sad to me. The most the dumpsters at this apartment has produced is smoke and flames (and last week an awful, stained, green office chair... no thanks). 

Has anyone else discovered any dumpster treasures??

Thursday, November 3, 2011

Before and After: Thrift Store Mirror

I found this mirror at my local thrift store for $7.99 (plus, a Military discount of 20%... sweeet!).  It wasn't perfect but with a little sanding and paint, I figured I could make it into something beautiful. 


I really craved a bold and fun color so I chose a shade of turquoise that came out of my picture above my living room sofa.  I wanted a color that would pop against the boring, bland and beigeness of our standard rental walls. 


After some sanding and a few coats of paint it was done and ready to be hung on the wall of the adjoining dining area.


This was a fairly cheap project that came to about $15 (a quart of paint and I already had the sandpaper and paint brushes). 

Monday, October 24, 2011

Updates and Before and After: Chair Seat Recovering

Not long after I wrote the previous post, my husband came home after getting a call from the animal shelter telling him that we could pick up the new cat.  We brought home Salem and this weekend has been a little tense between Ian and the new arrival.  I was afraid my sweet little Ian would become distant and angry for bringing in a new cat into the household.  But, he seems to be getting back to normal.  Salem is a very sweet cat and I think Ian is learning that he's not threatening (seriously, Salem will purr and head butt you for a steady hour).  So, things are getting better.  


I've also been working on my painted curtains this weekend.  After using my sponge brush I already owned, I decided that I really needed to invest in a roller to help me out.  I had a coupon for 20% off Michael's yesterday and bought the roller.  I've been using it last night and this morning and it seems to help a great deal.  But, this curtain undertaking really isn't an easy project.  It's tedious and I've had to do two coats already with my acrylic paint.  So far, I've taken the painting tape off of two stripes and hung up the curtains to dry.  Annnnd.... I'm pretty happy with how it looks.  I'll take some pictures when I've gotten one panel done. 


Within the last month or so I recently finished a project that I've been holding off on for over a YEAR!  I bought a sturdy chair from Thrift Store USA and I think it was around $14.  Besides the seat cushion, the chair was in pretty good condition but I definitely wanted to recover the cushion.  I was also planning once upon a time to paint it but I'm glad I decided to keep the wood. 


After searching FOREVER to find a fabric that I liked enough to bother spending the money on (I'd like to think that that's what took over a year... not my procrastination) I stumbled upon Tonic Living and fell in love.   I love Tonic Living's geometric designs, something about them is just pleasing to my eye.  

The cushion was in relatively good condition and I had enough extra fabric to recover the chair twice if it needed to be replaced down the line, I just stapled the fabric over the existing fabric. 

Oooh I see some dusts!  Oops!

Sooooo cute!  So far, it's the only piece of furniture that I've found at a thrift store that'll fit in our house (there have been lots of beautiful dressers I've wanted to re-do but I have a huge apartment walk-in closet so a dresser would just be another thing we'd have to move... and it would probably be empty! ha).  But seriously, on a budget the thrift store can be a great source of furniture.  I didn't have to cover the cushion (and didn't for over a year) so it still would have been a cheap and well built chair for my space. 

Wednesday, October 19, 2011

Before and After: Dumpster Coffee Table

Is finding things by the dumpster yucky?  Well, sometimes.


I found this table sitting by the dumpster (which, my balcony overlooked the dumpster... sounds lovely, doesn’t it?) and snatched it up.  Actually the correct term would be hauled it up the stairs with my husband while saying, “Eww!  My hand stuck to this!”’ It was one of the most disgusting things I’ve ever had to clean (that includes messing around in the grease trap at Little Caesar’s!).  It strangely appeared to be the big brother to the Orangey table that I had painted the previous week.


I had to use Goo Gone to remove whatever gunk had adhered to the table and I don’t even want to think about what was on it or where the table came from.  I’d like to think it walked its way out of the nearby woods to sit by the dumpster. 


Once I had this clean slate I then had to decide what to do with it.  It was scuffed up already so I knew I’d have to cover it in paint to make it somewhat presentable.  Since I have a dark sofa and other dark furniture I wanted to go light with the finish to bring some interest to my space.  
I took some different paint samples from Walmart and decided on Better Homes and Garden’s Tempting Toasted Coconut. I had some ideas about painting a design or putting something with Modge Podge on the table but it wasn’t until I began sanding the table on my cramped balcony that I realized what I wanted to do.   The top looked so interesting and distressed while sanding it, I decided to just paint the base and leave the distressed finish. 
After a few coats of meticulously-applied paint, it turned out great.  Yet, months later I still have yet to put a clear coat to protect the wood top because I haven’t gotten around to it but I figure if anything happens to it, it’ll just add to the distressed finish!


I accomplished this project for $15 (one quart of paint and a nice paintbrush; please get a decent brush the first time because I used a cheap one before and it was terrible).

Thursday, October 13, 2011

Before and After: Dumpster Side Table

One Sunday morning I awoke, opened the blinds to our balcony that overlooked the pool and the complex dumpster (nice, huh?), and saw a small table sitting by the dumpster.  I rushed out of my pajamas, got dressed and ran down the stairs as if the furniture piece would have wandered off by the time I arrived.  I examined the piece for flaws and tested its sturdiness.  The legs were wobbly but upon further examination it was only because the previous owners hadn’t been smart enough to just screw them back on.  I looked around to see if anyone was watching and stole the table from the dumpster. 

I had been missing a coffee table since we moved in and decided that, while small, this table would be a perfect coffee table.  And even more perfect because I scored it for FREE!


After cleaning the table and living with it for a few days, everything just looked too brown.  My sofa, dining set, book shelf, and desk were all brown, brown, brown.  I craved more color and set out to paint the little coffee table and apply some faux finish to it.  First I needed a really bold color and decided on Better Homes & Gardens Flaming Roasted Pepper.  (If you’re going to faux finish something you probably want to pick a bright color so it doesn’t get too dark afterward.) 
I was really new to the whole sanding-and-painting thing so after reading a few blogs on the topic, I just tried my best.  I used light-grit sand paper and then cleaned all the dust from the surface before painting.  To get the best finish you want to do thin, even coats of paint.  I think I did about four because I’m just that meticulous about things.

Don't mind the cellphone picture, doesn't do the color justice.
After allowing significant drying time I applied my faux finish:

I had this leftover from another project, $15


I used a clean paint brush to apply the faux finish in a light fashion.  I just applied the amount that was appropriate for the look I was going for. 

I hand-painted the standard wooden knob for something a little more interesting... and also free.

It was still a little tacky so I put it on coasters before going on the carpet but I think it turned out great!  Just a little splash of color in a pretty neutral room.